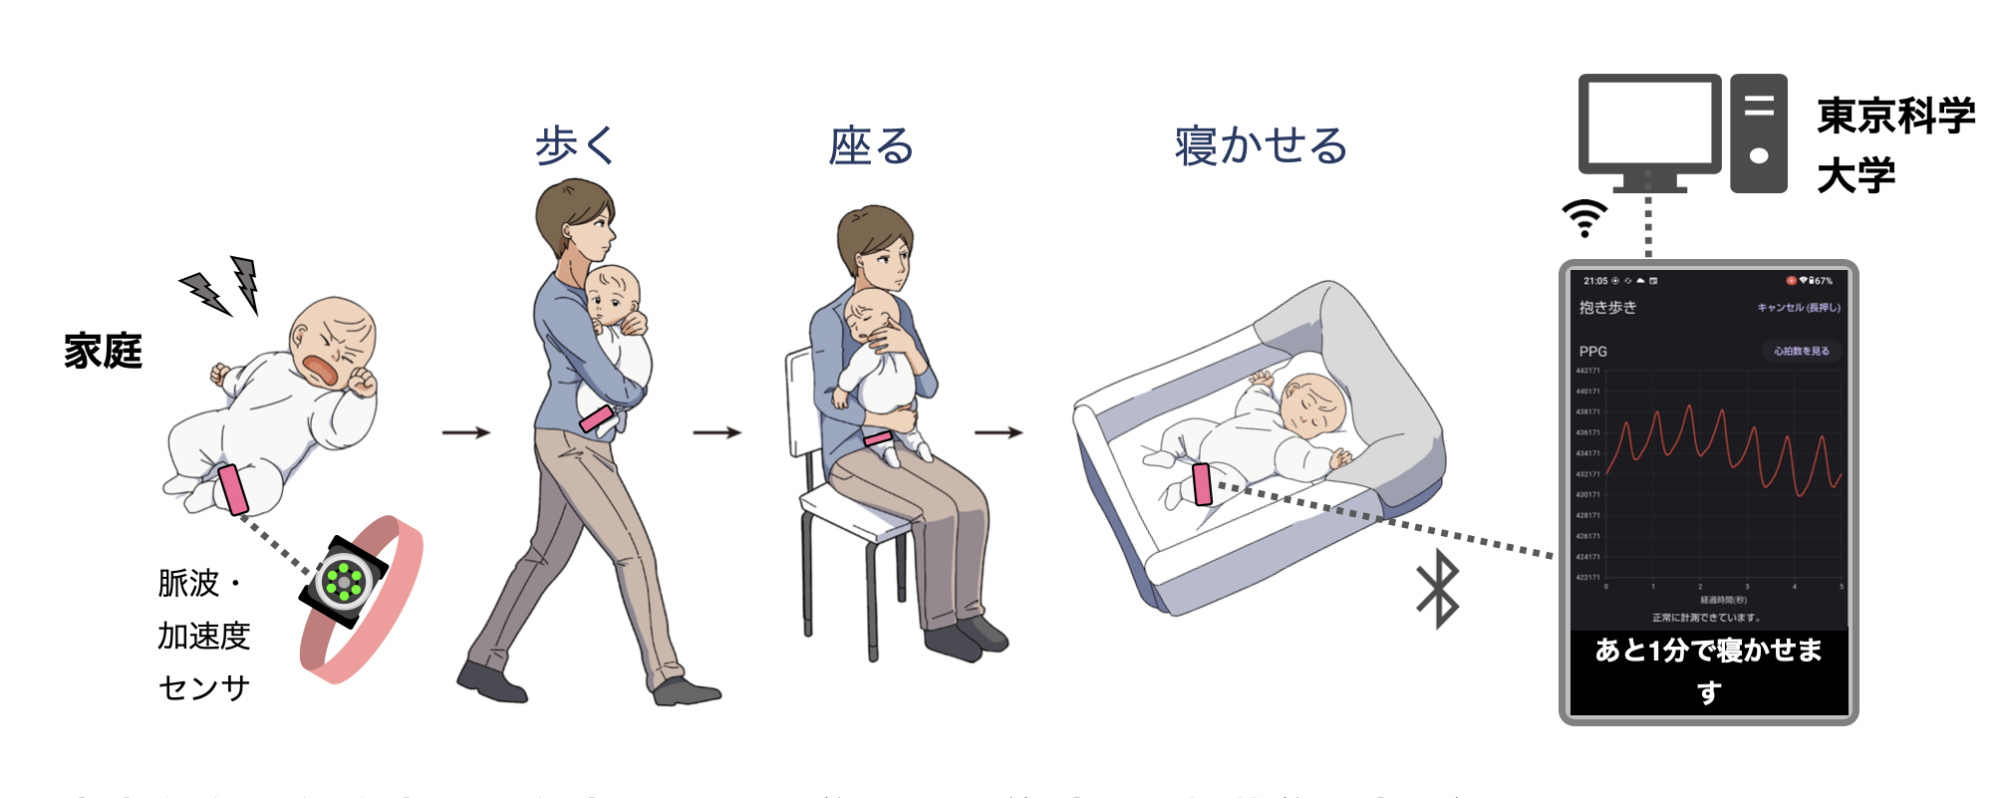
抱き歩きモードは Polar社製 腕時計型光学式センサー Polar VeritySense (以下センサーと表記する)を使用します。
※センサーをお持ちでない方は お試し版 抱き歩き モードをご利用ください。
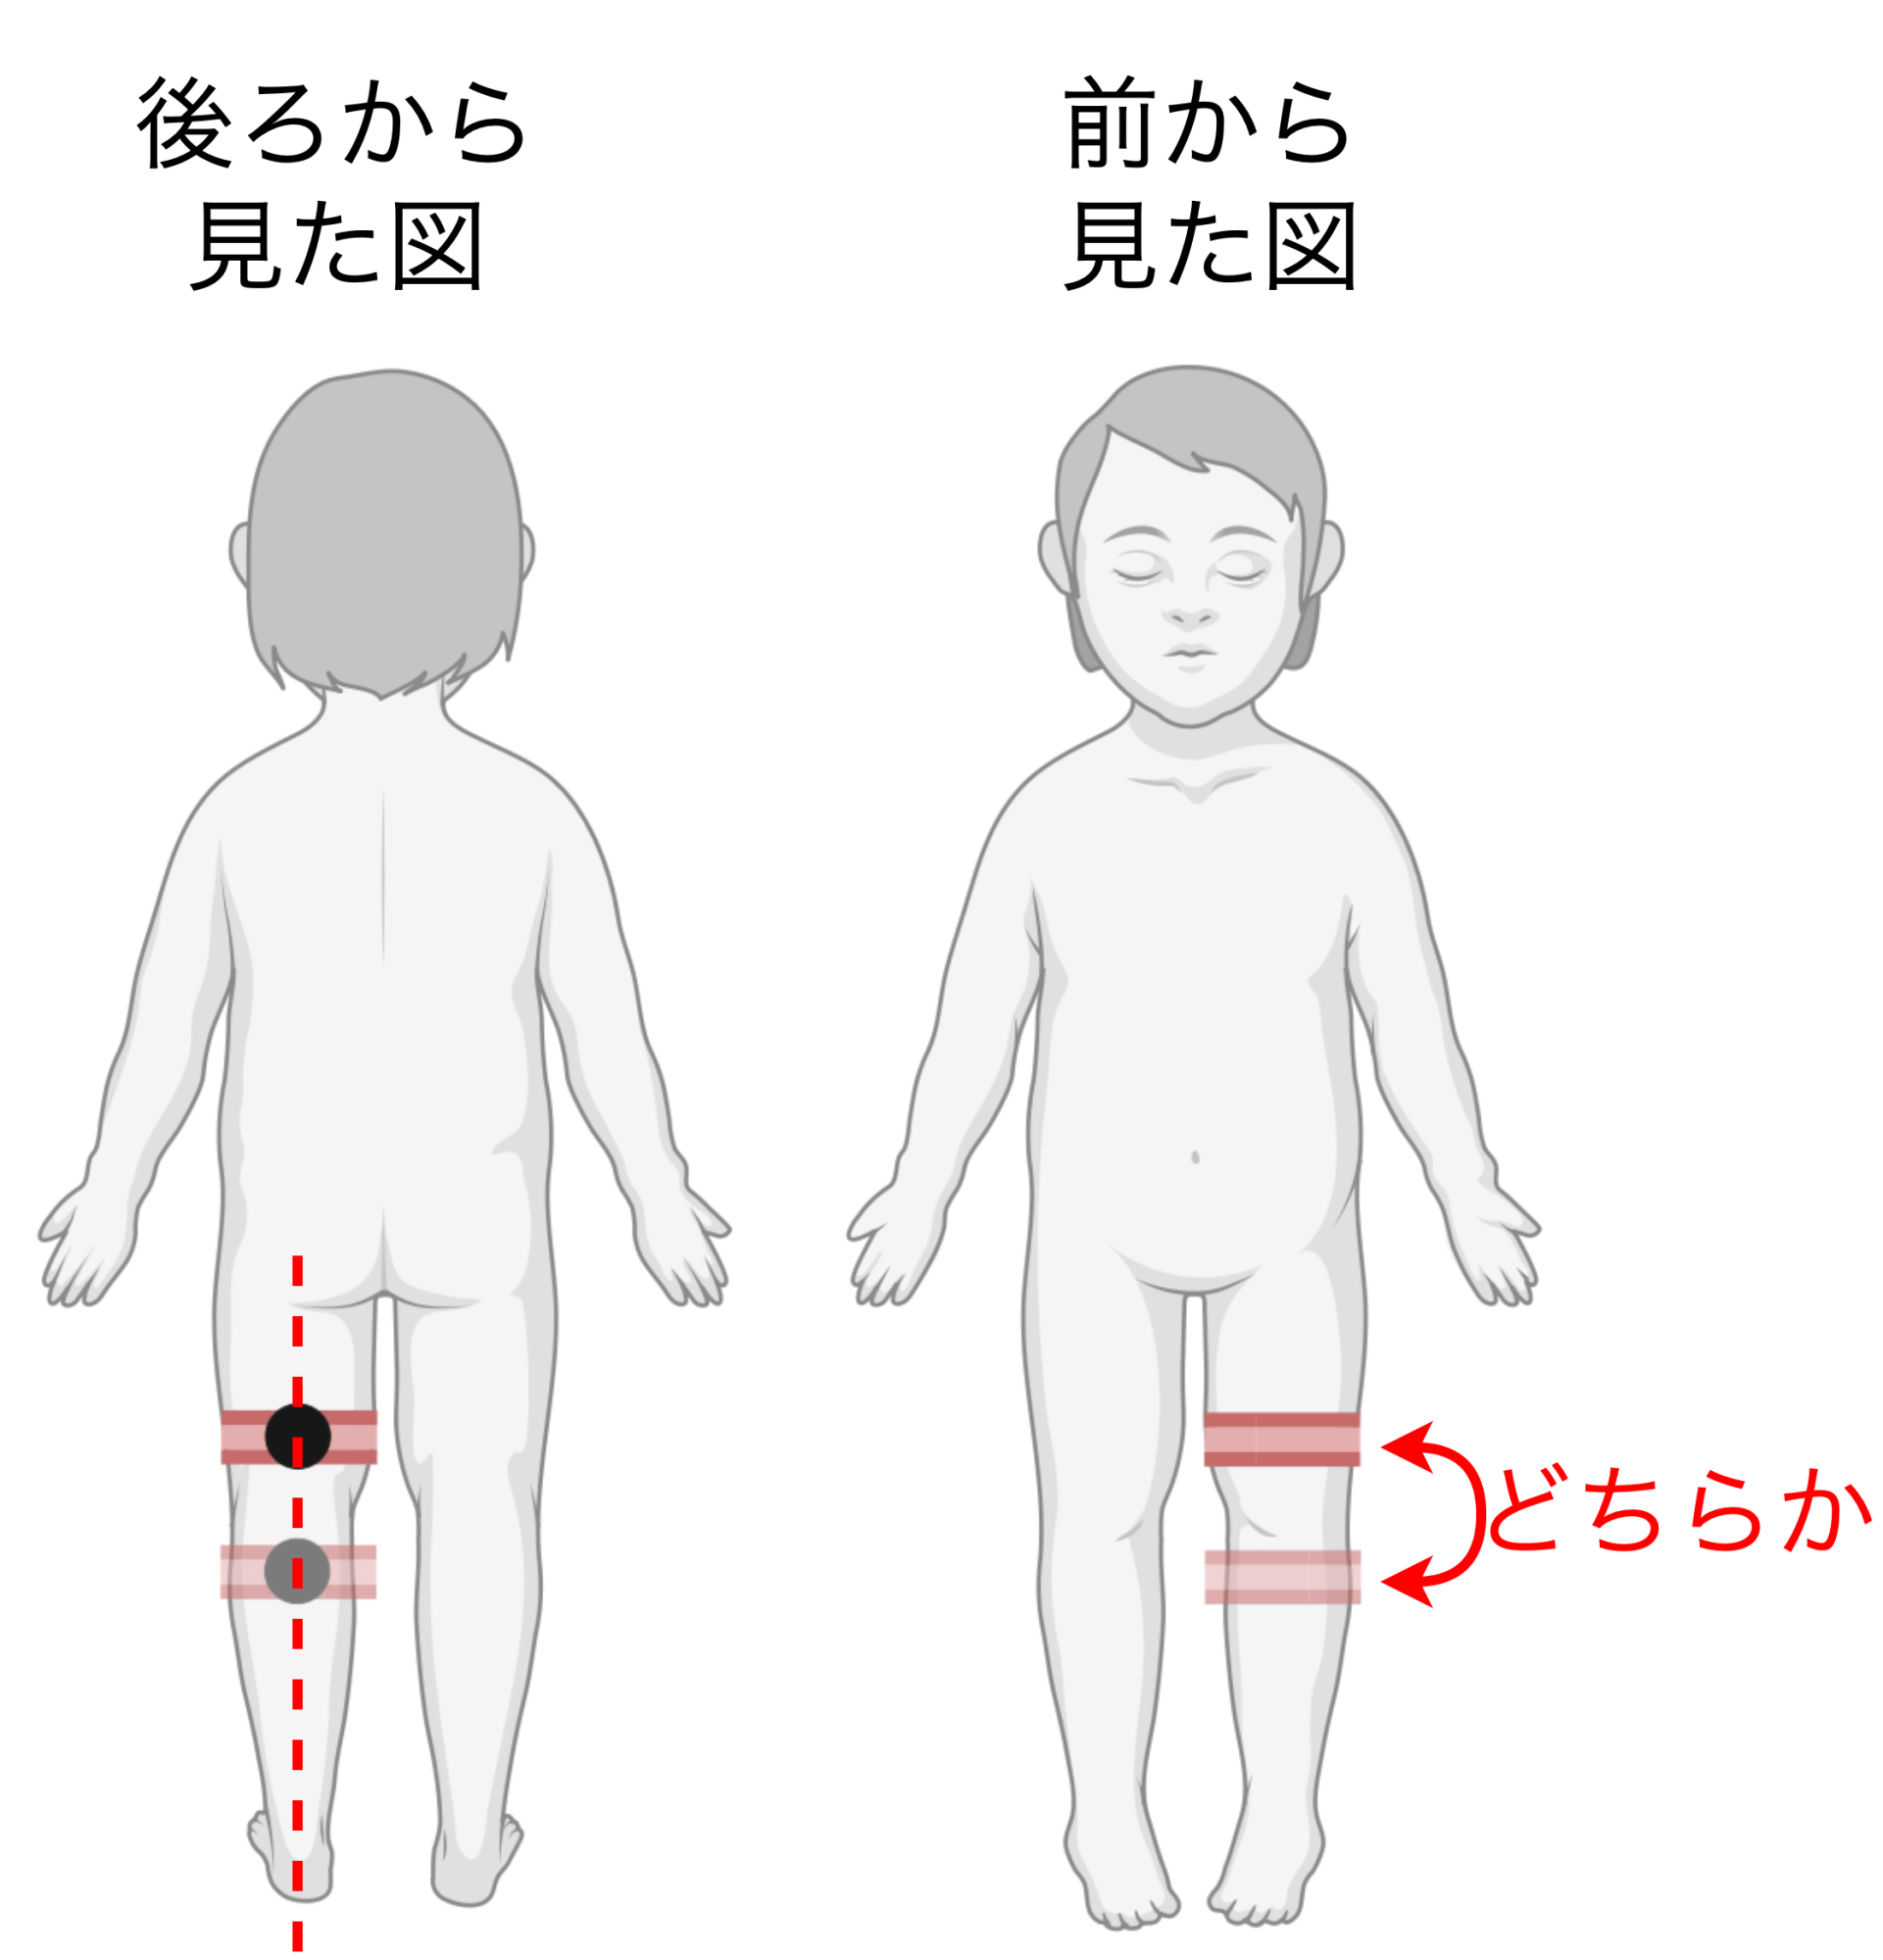
このモードでは赤ちゃんのふくらはぎもしくは太もも(注1)にセンサーを取り付け、音声ガイドに従い、赤ちゃんの抱き歩きをします。
計測中は赤ちゃんの心拍状態をグラフ表示でご確認いただけます。
注1)脈拍信号(PPG、赤い波)がよく見える場所には個人差がありますが、膝裏の少し上または下にセンサーの緑に光る部分がくるようにするのがおすすめです。マニュアルの図を参照ください。
※インストール後初めてのご利用では初回設定が必要です。初回設定 のページをご確認下さい。


内容
- PolarVeritySenseセンサーをアプリと連携する
- センサーを赤ちゃんに着ける
- 30秒または5分待つ(ランダム)
- 事前案内と赤ちゃんの状態メモ
- 抱き歩き 5分 BGM付き
- (泣き止まない場合は抱き歩き5分延長が1回のみ可能です)
- 座り待ち 8分
- お布団に寝かせる
- 赤ちゃんの状態、メモ等の入力
- 記録の送信
センサーをつけてから、お布団に寝かせるまでの間、いつでも心拍グラフ(HR、黄色い線)と光電脈波グラフ(PPG、赤い波)を確認できます。
所要時間は15〜30分ほどになります。
センサーを用意する
センサーのバッテリーが30%以下の場合は開始することができません。
予め専用USB充電器を用いて充電しておいてください。
充電中のセンサーが緑色に光っていれば十分に充電できています。
オレンジの場合はまだ充電中ですが抱き歩きを開始することができます。
赤色に点滅している場合はバッテリー残量が足りません。充電完了を待つか、お急ぎの場合はセンサーを使用しない「お試し版 寝かしつけ」モードをご利用ください。
※Polar Verity Senseセンサーのアップデート等により目安となる光り方が変わる可能性があります。
詳細なバッテリー残量は、次の接続手順の後に10%単位で表示されます。
新品のPolarセンサーは100%の充電から10時間以上連続使用することができます。
※公称値30時間
※万一ベルトからセンサーが外れると誤嚥の恐れがあるため、寝かせた後は必ずセンサーを外してください。
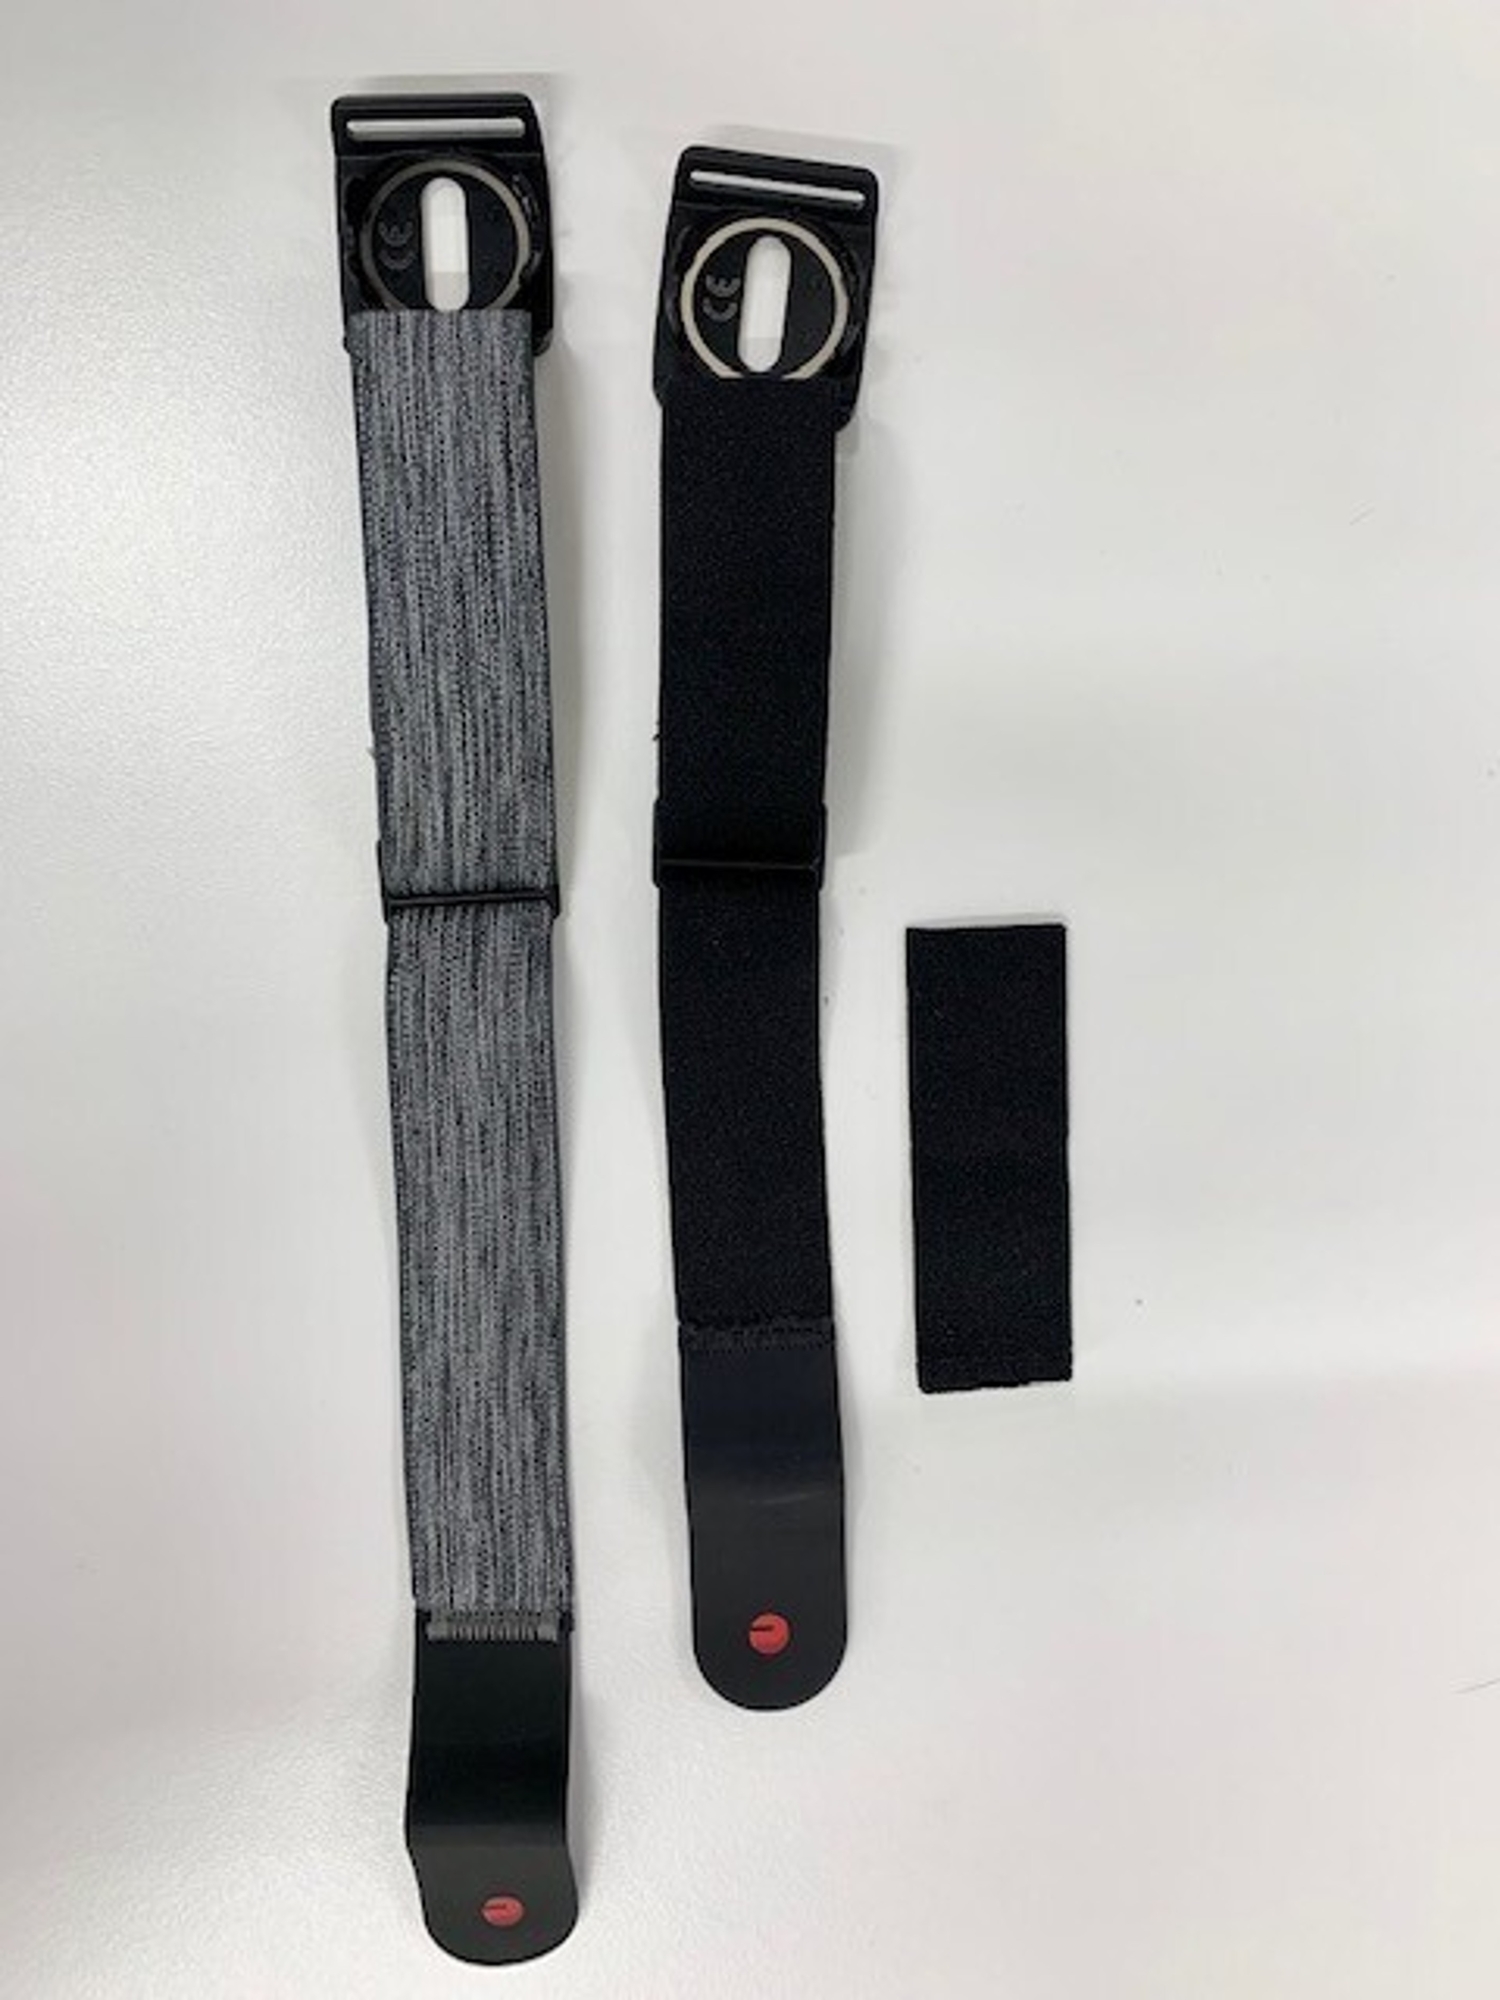
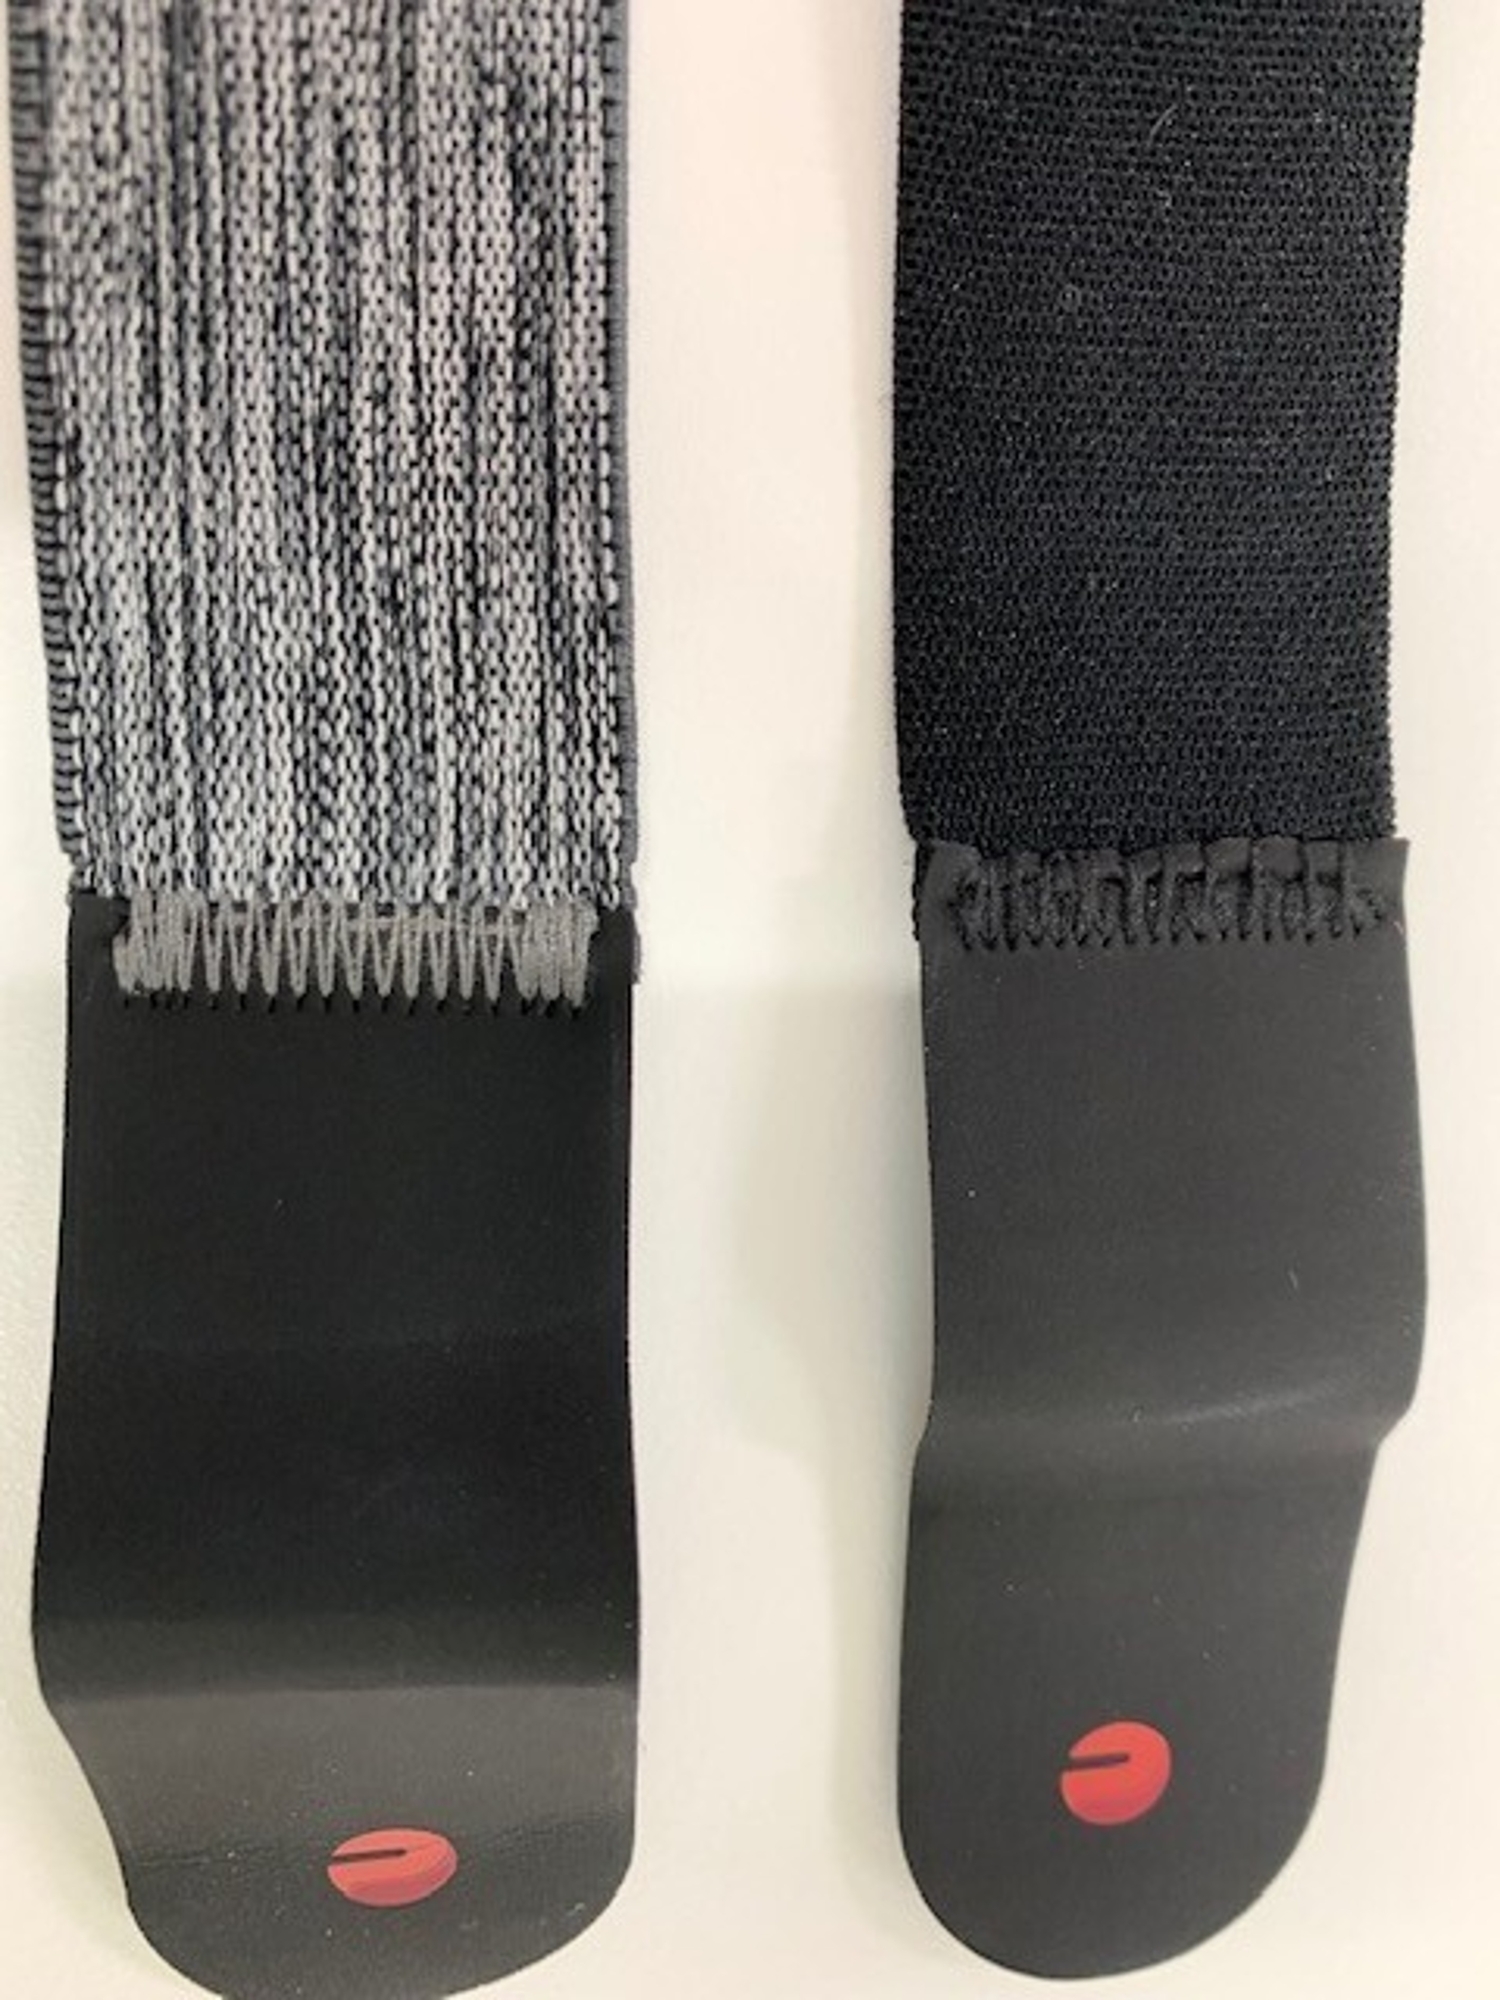
PolarVeritySenseセンサーの付属ベルトは大人の腕用であるため、月齢が小さい・足が細い赤ちゃんでは長すぎてフィットさせることができません。この場合はあらかじめベルトを短く調整しておいてください。カットして縫い直すか、またはつまみ縫いをして5cmほど短くするとよいでしょう。
予め専用USB充電器を用いて充電しておいてください。
充電中のセンサーが緑色に光っていれば十分に充電できています。
オレンジの場合はまだ充電中ですが抱き歩きを開始することができます。
赤色に点滅している場合はバッテリー残量が足りません。充電完了を待つか、お急ぎの場合はセンサーを使用しない「お試し版 寝かしつけ」モードをご利用ください。
※Polar Verity Senseセンサーのアップデート等により目安となる光り方が変わる可能性があります。
詳細なバッテリー残量は、次の接続手順の後に10%単位で表示されます。
新品のPolarセンサーは100%の充電から10時間以上連続使用することができます。
※公称値30時間
※万一ベルトからセンサーが外れると誤嚥の恐れがあるため、寝かせた後は必ずセンサーを外してください。
PolarVeritySenseセンサーの付属ベルトは大人の腕用であるため、月齢が小さい・足が細い赤ちゃんでは長すぎてフィットさせることができません。この場合はあらかじめベルトを短く調整しておいてください。カットして縫い直すか、またはつまみ縫いをして5cmほど短くするとよいでしょう。


はじめる
モードを開始すると、まず付近のセンサーの検索を行います。この時、スマホの設定でWi-Fi接続,Bluetoothのオン、その他各種必要な権限を求められますので、アプリの表示に従い設定を行なってください。
検索が始まったらセンサーの電源をオンにし、表示されたデバイスに接続してください。充電中のセンサーも表示されますが、充電中はセンサーは正常に動作しません。(充電残量やグラフも正しく表示されません)
※2台以上のセンサーをお持ちの場合は複数台表示されます。この場合はセンサー側面のデバイスIDをご確認ください。
検索が始まったらセンサーの電源をオンにし、表示されたデバイスに接続してください。充電中のセンサーも表示されますが、充電中はセンサーは正常に動作しません。(充電残量やグラフも正しく表示されません)
※2台以上のセンサーをお持ちの場合は複数台表示されます。この場合はセンサー側面のデバイスIDをご確認ください。
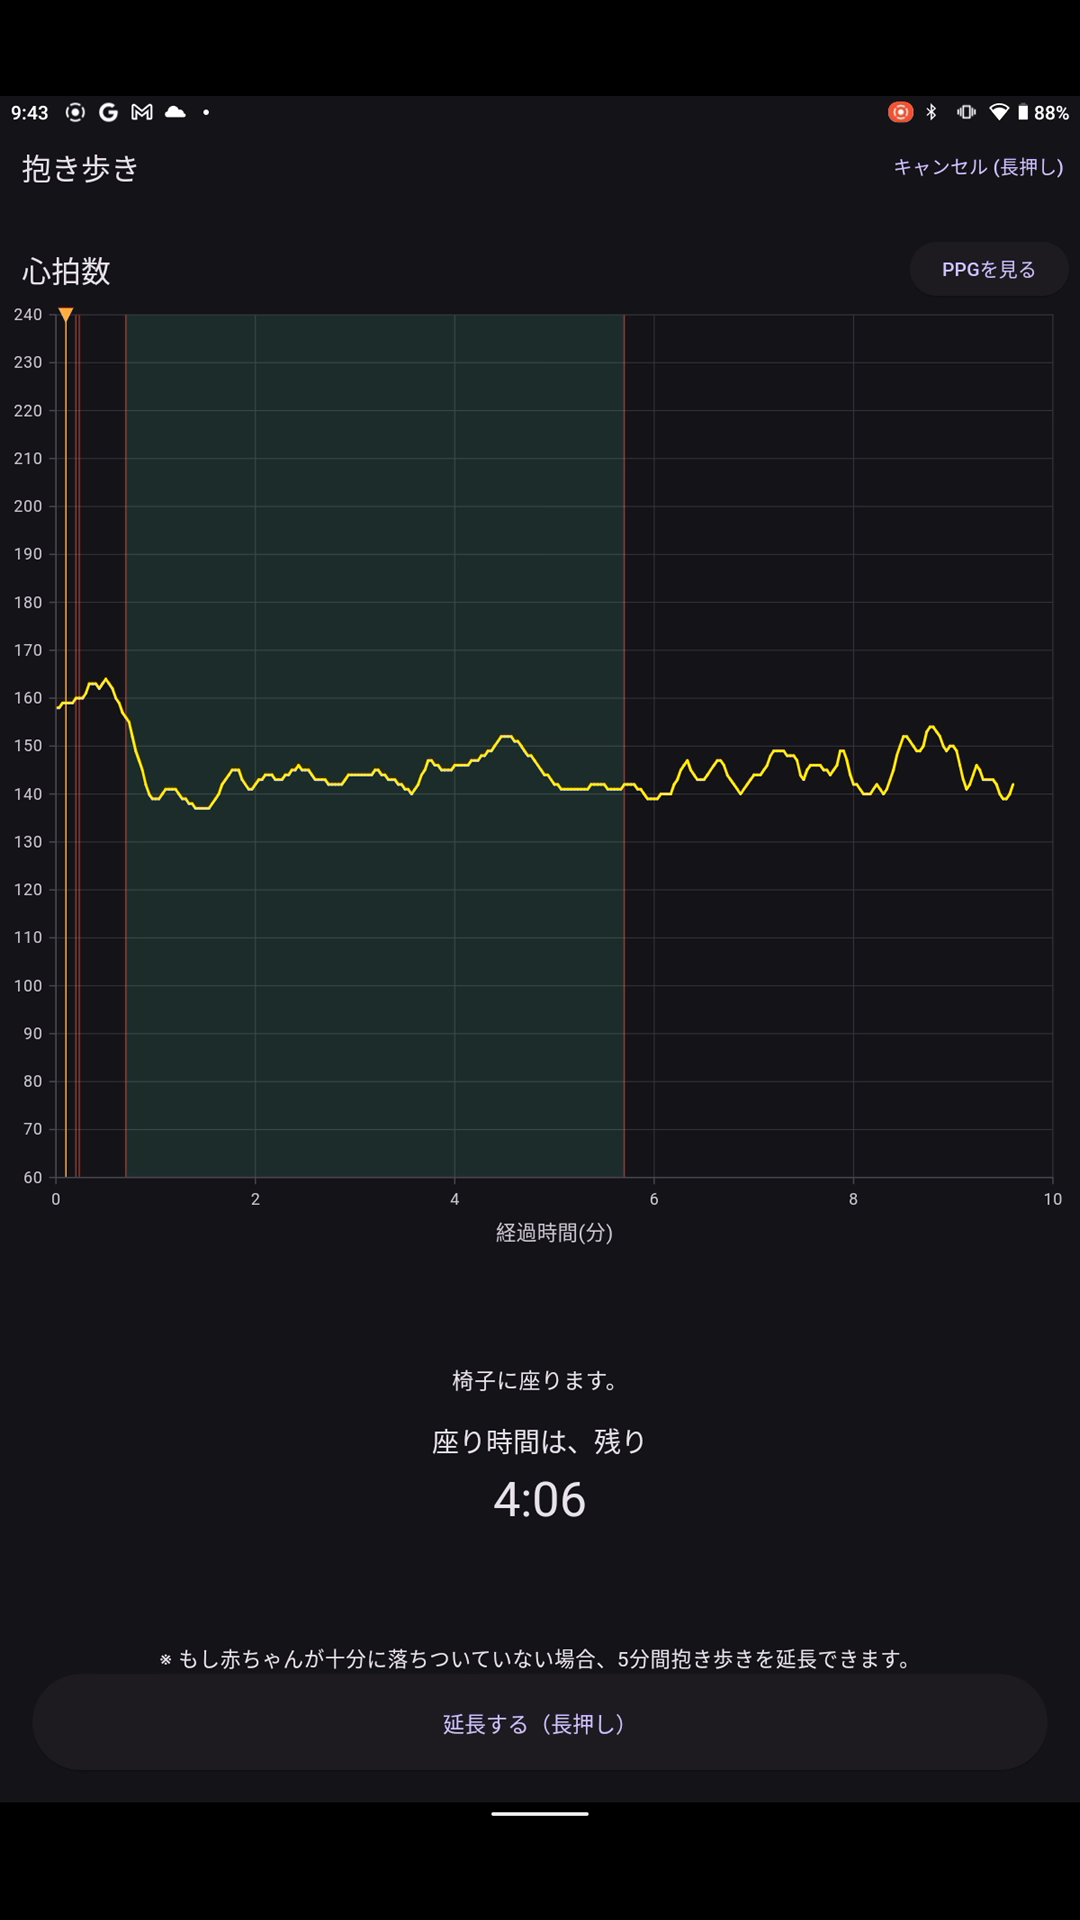
PPG(光電脈波)を見る
センサーに接続し計測を開始すると、PPG(光電脈波、赤線)のグラフを確認する画面に進みます。
赤ちゃんの膝の裏の少し上または下の位置に、直接お肌に触れるようにセンサーを付けます。このとき、ベルトがゆるすぎるとセンサーが動いてしまいます。きつすぎるとセンサーが皮膚の下の血流をさまたげ、脈拍が測定されにくくなります。動かずぴったりとお肌にくっつくようにベルトを調節します。その上からズボンを着せていただいてかまいません。
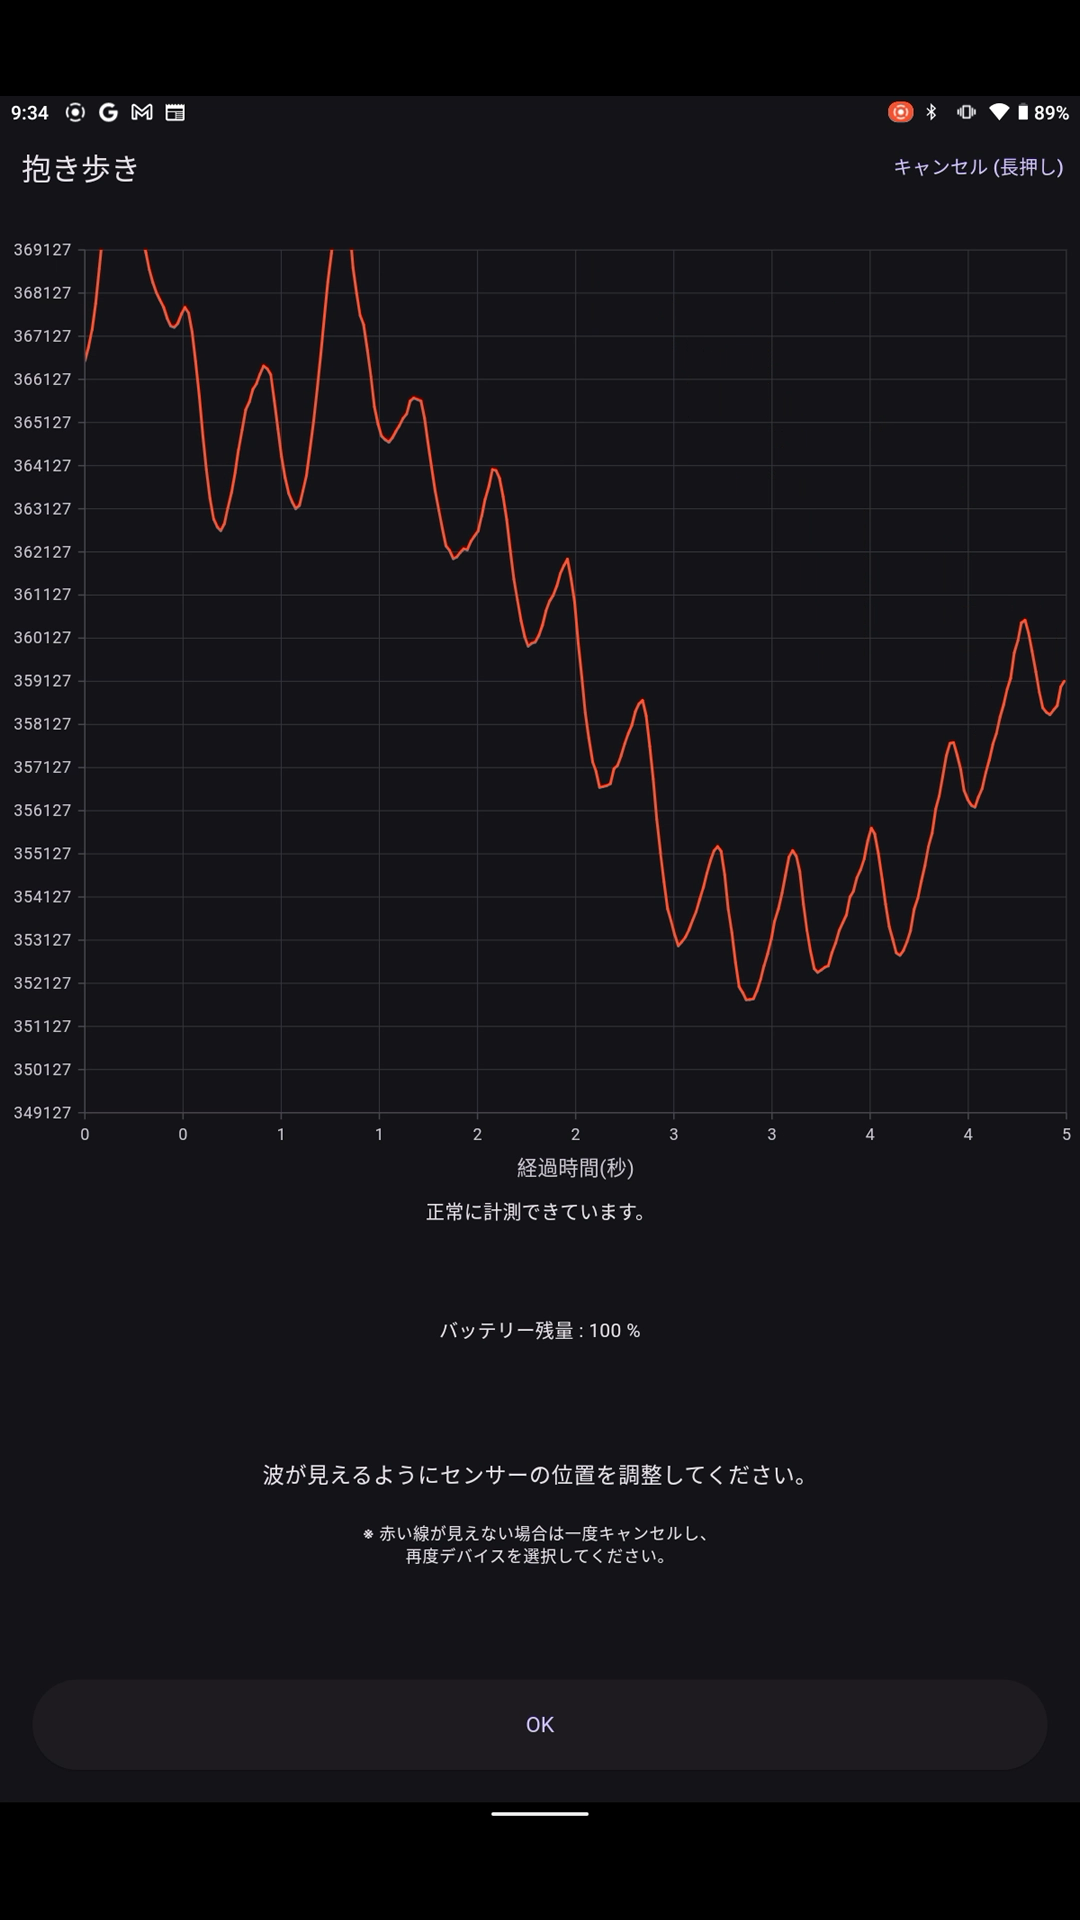
センサーの最適な位置には個人差があります。赤い線の波(脈波)が図のように、定期的に1メモリ以上の深さで見えるように、少しずつセンサーの位置をずらしてみてください。はじめは赤ちゃんが落ち着いて静かにしている時に行って、よい場所を探しておくとよいでしょう。
センサー位置やベルトの締め具合がうまく調節できると、脈拍の波が安定して、1メモリ以上の深さで見えるようになります(図1)。こうなったら次の画面に進んでください。
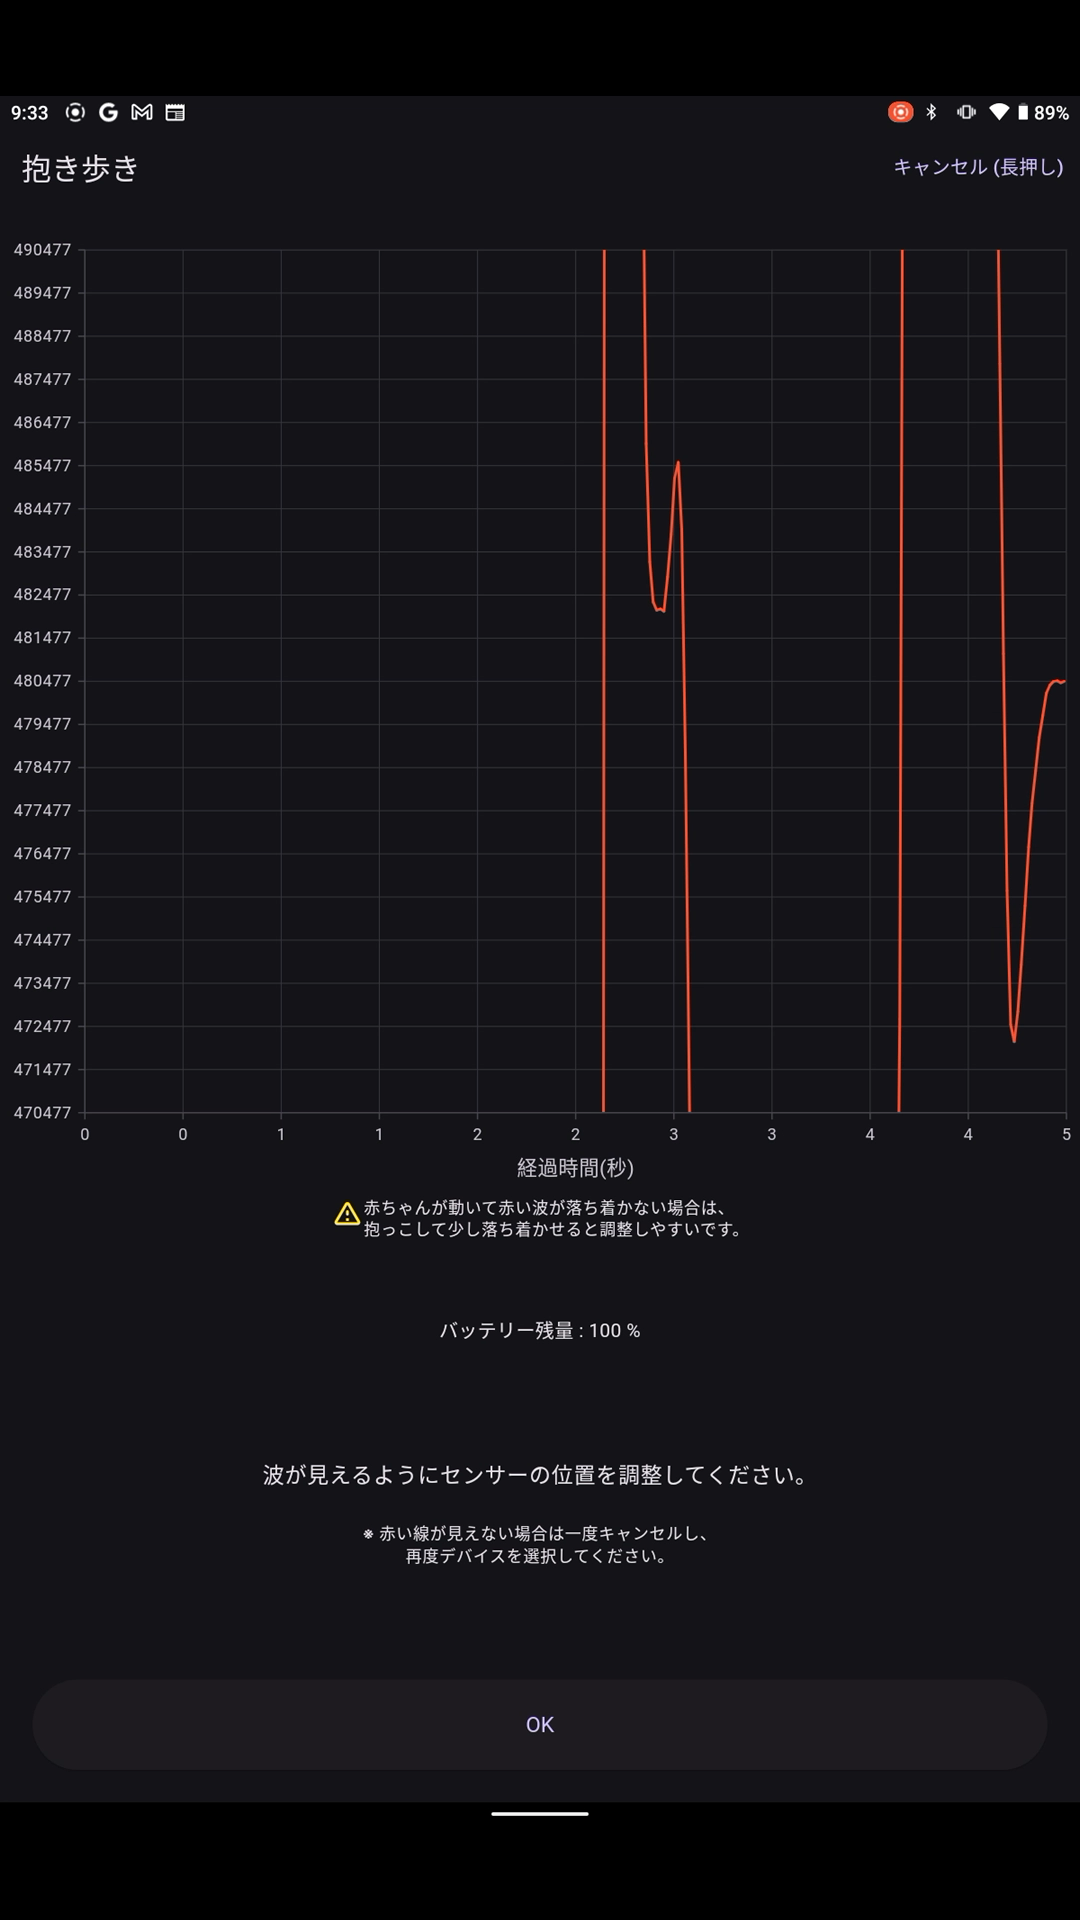
※赤ちゃんが泣いていたり、活発に動いている時は、赤い線が大きく乱れて定期的な波が見えないことがあります(図2)。その時は一度だっこして少し落ち着かせてから調節してみてください。
※直射日光や大きな蛍光灯の下など非常に明るいところは波が乱れやすいため避けてください。


30秒または5分待つ
センサー測定値の安定化と赤ちゃんの最適な寝かしつけタイミングの予測調査のため、ランダムで30秒もしくは5分の待ち時間があります。もし赤ちゃんが泣いている場合には、座って抱っこやとんとんする、話しかけるなどの方法であやしていただいて大丈夫ですが、抱っこ歩きは待ち時間終了までお待ちください。
この間に赤ちゃんの状態記録や抱っこ紐・スリングの利用についての質問がありますので入力をお願いします。またこれから歩く場所が片付いていて、つまづくものがないように、待ち時間の間に確認してください。
抱き歩きの際に抱っこ紐・スリングを使う場合は、合図が出たら抱っこ紐に赤ちゃんを入れて準備してください。
この間に赤ちゃんの状態記録や抱っこ紐・スリングの利用についての質問がありますので入力をお願いします。またこれから歩く場所が片付いていて、つまづくものがないように、待ち時間の間に確認してください。
抱き歩きの際に抱っこ紐・スリングを使う場合は、合図が出たら抱っこ紐に赤ちゃんを入れて準備してください。
抱き歩き
3つのカウント(音)の後、5分間の抱き歩きを開始します。
音楽に合わせ、一定のテンポでできるだけ止まらないよう、赤ちゃんの抱き歩きをしてください。
(アプリの設定でBGMを変更できます)
歩いている間は、赤ちゃんが寝ても立ち止まらず、淡々と終了の合図まで歩き続けるのがコツです。
音楽に合わせ、一定のテンポでできるだけ止まらないよう、赤ちゃんの抱き歩きをしてください。
(アプリの設定でBGMを変更できます)
歩いている間は、赤ちゃんが寝ても立ち止まらず、淡々と終了の合図まで歩き続けるのがコツです。
8分待ってから寝かせる
お布団に寝かせる前に、8分間椅子やソファに座って待ちます。この間に寝つく赤ちゃんもいます。
ここからナレーションの音量は少し小さめになりますが、それでも音声で赤ちゃんが起きてしまう場合、音量は適度に下げておくと良いです。
途中、赤ちゃんが起きてしまったり、まだ寝ていなかったりする場合、「延長する」ボタンを押すと再度抱き歩きが行えます。
万一センサーがベルトから外れると誤嚥の恐れがあるため、赤ちゃんを寝かせた後、センサーは必ず外し、赤ちゃんの手の届かない場所においてください。
記録してアップロード
各時点での赤ちゃんの状態とメモを記録します。メモ欄は空欄でも大丈夫です。
※個人情報は書かないでください。
また、いくつか研究のための質問も含まれます。
ご協力よろしくお願い致します。
それぞれの時点の状態とメモは、あとで記録データモードから見ることができます。
その後サーバーへのデータ送信(アップロード)があります。
回線の速度にもよりますが、一般的なWi-Fi接続であれば15分〜30分の計測分でアップロードに1〜3分程度の時間がかかります。送信終了後、SciBabyアプリを終了します。
途中で通信が切れた場合は送信が失敗することがあります。この場合は次回抱き歩きモードを開いた際に、再度送信を行います。あらかじめ、再度抱き歩きモードを開き、再送信確認の案内に従ってアップロードを行なっておくとスムーズです。
記録を見る
過去の計測や記録の内容は「記録データ」から確認できます。
Carry-and-Walk Mode
What is Baby-Carrying Mode?
Baby-Carrying Mode uses the Polar VeritySense wrist-worn optical sensor (hereinafter referred to as the sensor) manufactured by Polar.
*If you do not have the sensor, please use the trial version of Baby-Carrying Mode.
In this mode, attach the sensor to your baby's calf or thigh (Note 1) and follow the voice guidance to carry your baby while walking.
During measurement, you can view your baby's heart rate status as a graph.
Note 1) While the location where the pulse signal (PPG, red wave) is most visible varies by individual, we recommend positioning the sensor's green light slightly above or below the back of the knee. Please refer to the manual's diagram.
※ Initial setup is required upon first use after installation. Please check the Initial Setup page.
Content
Connect the Polar VeritySense sensor to the app
Attach the sensor to the baby
Wait 30 seconds or 5 minutes (random)
Pre-notification and baby status memo
Walking while holding baby for 5 minutes with BGM
(If crying persists, walking while holding baby may be extended once for 5 minutes)
Wait seated for 8 minutes
Lay the baby down on the futon
Input baby's condition, notes, etc.
Send the record
From attaching the sensor until laying the baby down on the futon, you can check the heart rate graph (HR, yellow line) and photoplethysmography graph (PPG, red wave) at any time.
The entire process takes approximately 15 to 30 minutes.
Prepare the sensor
The sensor cannot start if its battery is below 30%.
Please charge it beforehand using the dedicated USB charger.
If the sensor glows green while charging, it is sufficiently charged.
If it glows orange, it is still charging but you can start carrying your baby.
If it flashes red, the battery level is insufficient. Wait for charging to complete, or if you are in a hurry, use the “Trial Version Sleep Mode” without the sensor.
*The indicator light behavior may change due to Polar Verity Sense sensor updates.
Detailed battery level will be displayed in 10% increments after the next connection step.
A new Polar sensor can operate continuously for over 10 hours from a 100% charge.
*Rated for 30 hours
*If the sensor detaches from the belt, there is a risk of aspiration. Always remove the sensor after putting the baby to sleep.
The included PolarVeritySense sensor belt is designed for adult arms and may be too long to fit securely on infants with smaller wrists or slender legs. In such cases, adjust the belt to a shorter length beforehand. You can either cut and resew it, or use a slip stitch to shorten it by approximately 5 cm.
Start
When you start the mode, it will first search for nearby sensors. At this time, your smartphone settings will prompt you to enable Wi-Fi, Bluetooth, and other necessary permissions. Please follow the app's instructions to complete these settings.
Once the search begins, turn on the sensor's power and connect to the displayed device. Sensors charging will also appear, but they will not function properly while charging. (Charge levels and graphs will not display correctly either)
※If you have two or more sensors, multiple devices will be displayed. In this case, please check the Device ID on the sensor's side.
Viewing the PPG (Photoplethysmogram)
After connecting the sensor and starting measurement, the screen will display the PPG (photoplethysmogram, red line) graph.
Place the sensor directly on the baby's skin, slightly above or below the back of the knee. If the belt is too loose, the sensor will move. If it is too tight, the sensor may obstruct blood flow beneath the skin, making pulse measurement difficult. Adjust the belt so it fits snugly and securely against the skin without moving. It is acceptable to dress the baby in pants over the sensor.
The optimal sensor position varies between individuals. Gradually adjust the sensor's position until the red waveform (pulse wave) appears regularly at a depth of at least one mark, as shown in the figure. It is best to find a good position initially when the baby is calm and quiet.
When the sensor position and belt tightness are properly adjusted, the pulse wave will stabilize and appear at a depth of at least one mark (Figure 1). Once this occurs, proceed to the next screen.
※ If the baby is crying or moving actively, the red line may become significantly distorted, making it difficult to see regular waves (Figure 2). In such cases, try holding the baby to calm them down before adjusting the sensor.
※ Avoid extremely bright locations, such as direct sunlight or under large fluorescent lights, as these can easily cause wave distortion.
Wait 30 seconds or 5 minutes
To stabilize sensor readings and predict the optimal time to put your baby to sleep, there will be a random waiting period of either 30 seconds or 5 minutes. If your baby is crying, it's okay to soothe them by sitting down and holding them, patting them, or talking to them. However, please refrain from walking while holding them until the waiting period ends.
During this time, please complete the questions regarding your baby's condition and the use of baby carriers or slings. Also, please use the waiting period to ensure the walking area is clear and free of tripping hazards.
If using a baby carrier or sling for walking, please place your baby in the carrier and get ready when the signal is given.
Carrying while walking
After three counts (beats), begin the 5-minute baby-carrying walk.
Walk with your baby to the music at a steady tempo, trying not to stop as much as possible.
(You can change the background music in the app settings.)
The key is to keep walking steadily until the end signal, even if your baby falls asleep while walking.
Wait 8 minutes, then let it rest.
Before placing your baby in the bedding, wait for 8 minutes while sitting in a chair or on the sofa. Some babies may fall asleep during this time.
The narration volume will be slightly lower from here on, but if the sound still wakes your baby, it's best to keep the volume moderately low.
If your baby wakes up during this time or hasn't fallen asleep yet, press the “Extend” button to resume pacing with your baby.
When you hear the cue “Let's lay the baby down on the futon,” try putting the baby to sleep.
If the sensor accidentally comes off the belt, there is a risk of aspiration. Therefore, after laying the baby down, always remove the sensor and place it somewhere the baby cannot reach.
Record and upload
Record your baby's condition and notes at each time point. The notes field can be left blank.
※Please do not include any personal information.
It also includes several questions for research purposes.
Thank you for your cooperation.
You can view the condition and notes for each time point later in Record Data Mode.
After that, data will be sent (uploaded) to the server.
Depending on your connection speed, uploading 15 to 30 minutes of measurement data typically takes about 1 to 3 minutes over a standard Wi-Fi connection. After transmission completes, close the SciBaby app.
If the connection is lost during transmission, the upload may fail. In this case, the app will attempt to resend the data the next time you open the Baby-Carrying Mode. For smoother operation, open the Baby-Carrying Mode in advance and follow the prompts to confirm and perform the resend upload.
View Records
Past measurements and records can be viewed from “Record Data”.